Apple Nachos
Apples: not just for health freaks and teachers anymore! Let’s make apples accessible to everyone at the table. Whether it’s game night, a family reunion, or just a quiet Tuesday evening, apple nachos aren’t only a snack—they’re an invitation.
An invitation for everyone to sit down, get creative, and enjoy something delicious together! Let’s learn more about the apple nacho concept.
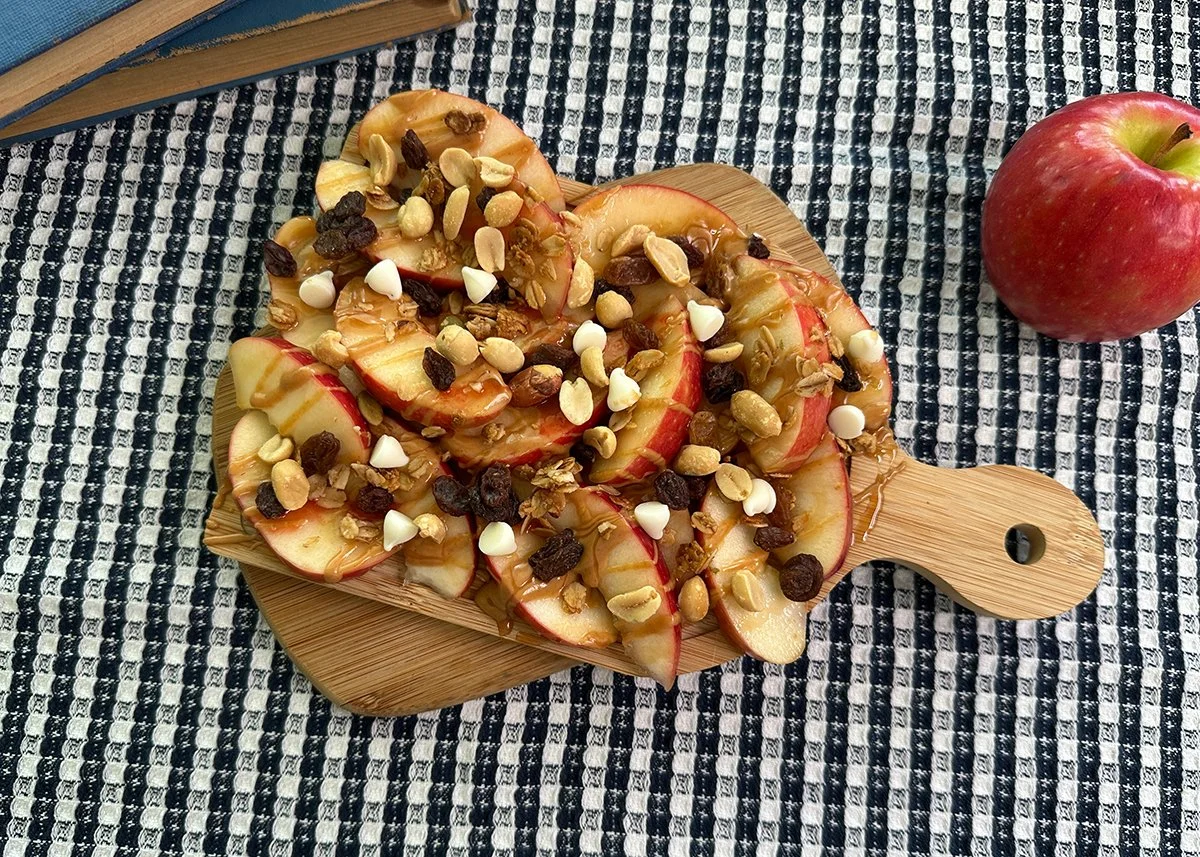
Never heard of apple nachos? Imagine: thinly sliced apples arranged like chips on a platter, topped with a colorful array of drizzles, sprinkles, and crunches. Deconstructed apple pie meets nacho night meets sundae bar—all in one bite.
These apple nachos are a blank canvas. The flexibility makes them accessible by all—they adapt to your table, not the other way around.
Step 1: The 🍎 Chips
Not all apples are created equal when it comes to “nachos.” One that holds its shape under a heavy drizzle of caramel and still offers a satisfying snap. This recipe calls for 2 apples, but feel free to adjust as needed for the size of your group!
My Go-To Picks: Honeycrisp & Pink Lady
While there are dozens of apple varieties out there, I always reach for the same two when making nachos: Honeycrisp and Pink Lady.
Why these two? Because they are the structural champions of the apple world.
Honeycrisp: If you want that explosive snap with every bite, this is it. Incredibly juicy, they are a balance of sweet and tart. They hold up well under heavy drizzles of caramel or peanut butter without turning mushy.
Pink Lady: These are my secret weapon for a sophisticated twist. They are firmer and denser than Honeycrisp, with a bright, tangy kick that cuts through rich, creamy toppings like whipped cream or chocolate.
💡 Pro Tip: The Anti-Browning Hack
Slice your apples.
Toss them gently in a bowl of cold water with a squeeze of lemon juice (about 1 tablespoon of juice per cup of water).
Let them sit for 5 minutes, then pat dry with a paper towel. Result: They stay bright white and crisp for hours, ready for your guests!
Step 2: Drizzles 🍎 and 🍏 Crunches
Now that your "chips" are ready, it's time to load up the platter. Think of this as your sundae bar moment. You'll want a mix of drizzles for flavor interest, and crunch for texture contrast.
Drizzles:
Peanut Butter - 2 tbsp (microwave for 30 seconds to drizzle)
Chocolate, Strawberry, and/or Caramel Syrup - 2 tsp
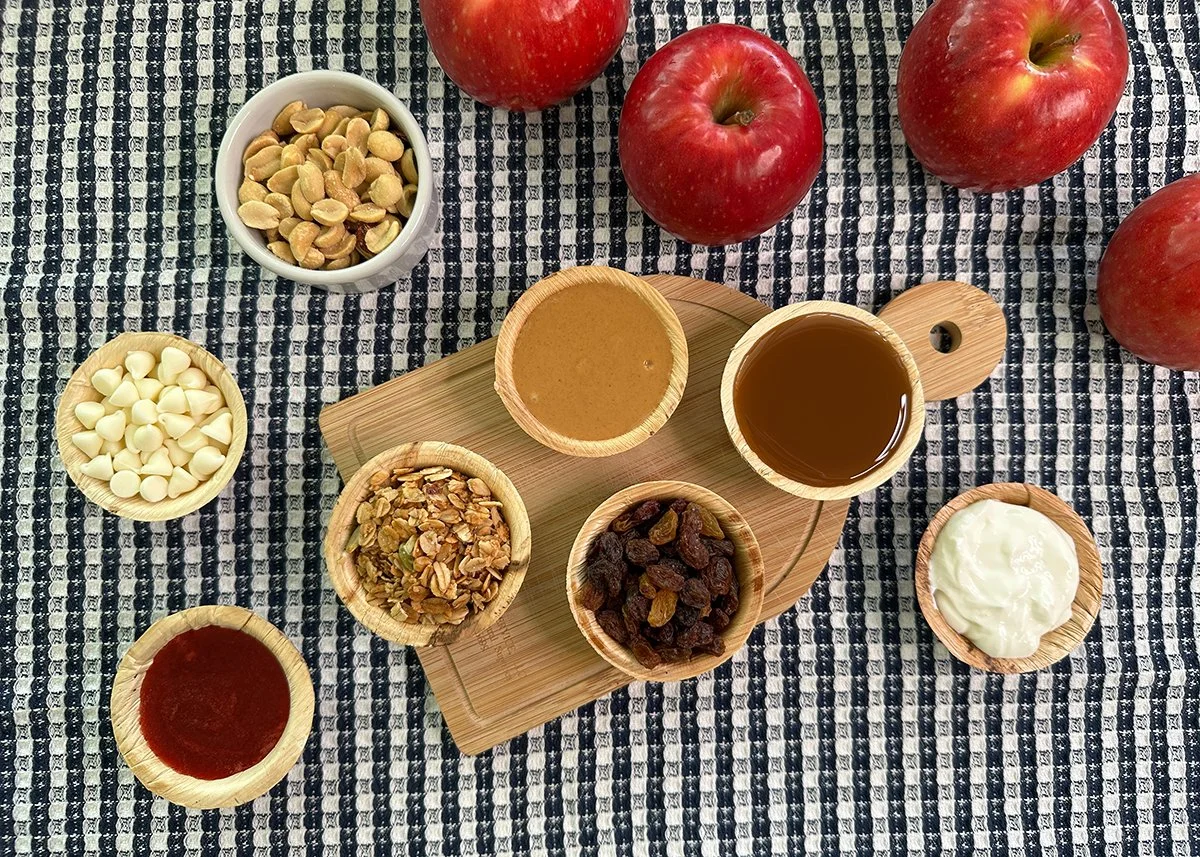
Crunches:
Chocolate, White Chocolate, Butterscotch, Peanut Butter, and/or Caramel Chips - 1 tbsp
Peanuts, Almonds, Pecans, or Walnuts - 1 tbsp
Niki’s Granola - 1 tbsp
Step 3: Building the Nachos
The secret to apple nachos is the order of operations. If you put the crunchies on first, they'll slide right off the smooth apple skin. We need to build a sticky foundation first!
Pick Your Vessel: Choose a pretty plate, shallow bowl, or large platter.
Lay the Base: Arrange your apple slices in a single, overlapping layer (like roof tiles) to maximize surface area.
The Sticky Layer: Drizzle your peanut butter and syrups generously over the apples. The warm peanut butter acts as a "glue" that helps the toppings stick.
The Crunch Explosion: Immediately sprinkle your crunches (chips, nuts, granola) over the wet drizzles. The sticky layer will catch them, ensuring every bite has the perfect ratio of apple, sauce, and crunch.
The Final Touch: Add a pinch of sea salt or a few fresh berries on top for a pop of color and added flair! We also love greek yogurt and whipped cream!
Step 4: Enjoy!
Gather friends and family around and dive in together! Apple nachos are a great snack to bring people together.
If you tried this recipe, I'd love to see your creations! Tag me on social media with #BokisKitchen or drop a comment below with your favorite topping combo. PS: If you haven't tried my granola yet, be sure to try it out for the ultimate crunch factor!

Apple Nachos
Never heard of apple nachos? Imagine: thinly sliced apples arranged like chips on a platter, topped with a colorful array of drizzles, sprinkles, and crunches. Deconstructed apple pie meets nacho night meets sundae bar—all in one bite.
Ingredients
Instructions
Nutrition Facts
Calories
316Fat
17 gSat. Fat
4 gCarbs
58 gFiber
10 gNet carbs
48 gSugar
42 gProtein
8 gSodium
142 mgCholesterol
0 mg